#20 Composing Atoms out of Quarks or Pictures in an Exhibition
Why?
After all these tips you are still asking why? Well, wait till you see it, it's cool.
What?
Ok, the premise here is very simple: create an image that consists of other tiny images and better yet, tiny copies of itself! The basic technique is real obvious and most of you probably played with it at one point. But there may be one or two details that can further your fun factor. Many variations on that theme, too. Let's jump right in:
1. Load yourself an image. If its not grayscale, convert it to grayscale (we'll do a color one later)
I have the trusty Albert image here, compressed a little for your download speed.
fig 1) 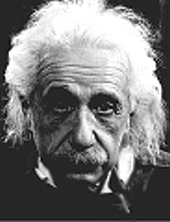
A grayscale Image....
2. Let's go for the full effect with recursion: We'll paint the Einstein out of thousands of teeny tiny little Einsteins....(just how many is up to you...) So, first make a copy (Image > Calculate > Duplicate) and then Resize that (Image > Image Size...) to a tiny little version...
Note : Please do not confuse "Zoom" with "Resize". Zoom is merely a quick and dirty close-up look to check pixels up close. Image Size will interpolate smoothly and do what's called `Resampling". Use Zoom In to apply a blur or other tool on a magnified view, Zoom Out to make the window smaller and drag it out of the way and Image Size if you really want a larger or smaller image...
Here is my little tiny Albert: (Resized to something like 21x27 )
fig 2) 
microAl
Press "command-a" to Select All of the tiny Albert image (fig 2) and then go to Edit > Define Pattern (second from bottom, grayed out until you have a selection...). Nothing will happen yet.
3. Now comes the critical step: change from Mode > Grayscale to Mode > Bitmap. During the transition a dialog will come up:
fig 3) 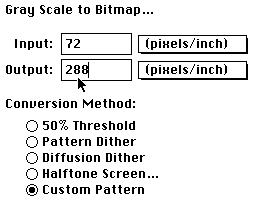
Setting the parameters for recursive pattern pictures
The point of the conversion is to click on the "Custom Pattern" choice, which will use the pattern we have just defined, namely the tiny Al pic. The way it will do it : It will take a region of the large image equal to the size of the pattern, determine the average brightness and then lighten/darken the pattern in one bit mode and substitute it for that section.
This can be simulated in Image > Map > Threshold and you can test whether the Pattern has enough range of shades available to do the grayscale approximation (a pattern consisting of just some black dots isn't too great. Suggested is to blur the pattern or use a gradient blend over it...) Tiny AL is just fine: in threshold you can see that it can go from solid black to solid white with plenty of steps in between....
Now the other key point is that it helps a great deal to multiply the output resolution! Think of it this way: The big Albert is, lets say, 200 pixels wide, the tiny one 20 pixels. That means you can fit 10 of them horizontally and maybe 13 or 14 vertically. Each one, though, will be a single-bit approximation of that area and all in all it will get very very "blocky". By changing the output resolution in the pop-up near the top you will create a much larger output image (they will always result in Bitmap mode, meaning 1 bit black and white...) utilizing many more of the tiny pattern pictures in the process.
I suggest that you multiply the output in multiples of the screen resolution of 72 dpi: e.g. 144, 216, 288 and so on.
The reason is simple: Imagine a chess board at 72 pixels. If you are trying to scale up that picture you can make each square exactly twice the size horizontally and vertically and you get an exact chess board again. 4 times the size would be 288 and still an exact version of it. If instead you simply typed in 300 dpi then something will have to give somewhere. A scaling error will appear, aslthough Photohsop does a very nice job in trying to distribute the error among all the pixels. Still, it is intrinsically cleaner to choose 288 than 300. Note: this is the same as the "4% reduction in the Page Setup `options' dialog...and also applies to resampling... go for integer multiples of all numbers whenever you can conveniently do it)
Thus, `720' or `1440 ` will yield truly excellent quality in gigantic size. If you apply this for a serious project (and you will) do give those higher output settings a try. You may end up with a 5 or 10 (or more) megabyte file, in single bit (!), but it's clearly worth it.
Here we have set it to 288 dpi.
4. Ok now as soon as you click `OK' it will happen all by itself. And here is what it looks like (the window would be in 1:8 zoom ratio at first (!)
fig 4) 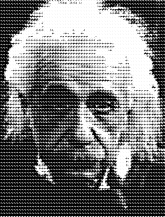
8 times Zoomed Out: an almost reasonable grayscale approximation of the original image...
...but... what looks like little square dots here ... is actually every time a tiny copy of the Einstein image itself! Zoom in eight times to really see what is going on!
5. I can't paste the huge real result here, put I can show you a detail area:
fig 5) 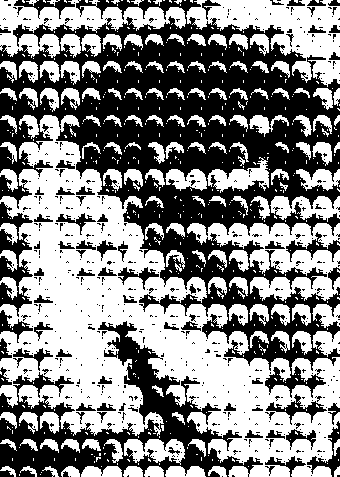
Close-up Zoom: here is the right eye and the nose composed of about 300 tiny Einsteins....
Pretty neat, eh...?
Warhol should have had it so easy....
Needless to say, since this is a single bit result, it prints pretty well even on a plain laser.
6. Here are some variations:
How about a title, word , company or product name composed of teeny other words or letters...? This has been done before in many ads and now you can do it too.
Example: A large version of the word "Art ?" (at 1024 size) composed of tiny copies of the words "This is not art" (subliminal truth in advertising)
fig 6) 
The tiny pattern: 4 words, blurred in order to make it easier to create 1 bit gray shades...
fig 7) 
The large image: One word. Real size: 1024x768x72dpi, notice the zoomed in rectangles
After conversion at 720 dpi the file is 10240 x 7680 pixels in one bit. (!) That's 9.8 megs, although it compresses very well.... At 1:7 Zoom-out it looks like this:
fig 8) 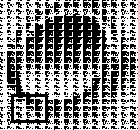
Here is a small part of the final Pix `n Pix effect, notice the zoomed rectangle
and at full 1:1 range the tiny chunk inside the period under the question mark looks like that:
fig 9) 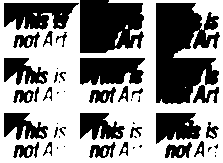
This is it at full resolution.. You can see how the pattern is
thinned or fattened to create the gray shades needed...
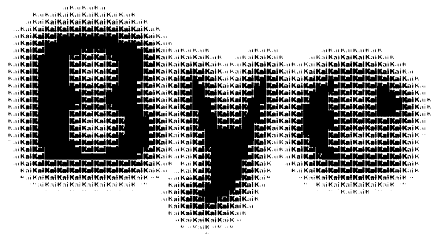
If you set it up just right, you can even get effects that cleanly modify font boldness (The main image should then be toned down in Levels... to eliminate solid black & solid white) See final "Bye" below.
7. A little tiny radial gradient is really well suited, too:
fig 10) 
tiny pattern with plenty of shades to modulate....
You may have already tried the "Adobe Patterns" some of which came with PS 2.01 for these conversions. They are EPS postscript patterns, but I often prefer more blurry ones created directly in PS. It is easy enough to make your own. Many, many variations.
I have also had good luck with color conversion: Here are the steps (no sample pix..way too big..)
a) Take an RGB color image and go to Mode > Split Channels. You get three grayscale ones called image.R, image.G and image.B
b) Define your small pattern
c) go to each r/g/b window and use Mode > Grayscale to Mode > Bitmap... setup the output res as needed.
d) go to each r/g/b window and now use Mode > Bitmap back to Mode > Grayscale.
Note: if you are trying to end up with a screen size image, you can use the "Size" option in the `Bitmap to Grayscale' dialog to shrink the image. If you say `2' your bitmap image will come in half size grayscale, `4' will be quarter size... With that setting of `4' it will take arrays of 4x4 1 bit pixels and average them to a resulting single grayscale pixel.
It's a nice way to get grays back from the single bit image and have more manageable sizes as well. You don't really want to convert a 10000x8000x1 image straight to grayscale at 1:1, it will needlessly become an 8 times bigger file without any more information in it. Set the size to 4 or even higher to get a small true gray image....
You can nicely set the `Gray to Bitmap' at 72 In and 144 Out, then set Bitmap to Gray at size "2" coming back to the original image size....
e) Go to Mode > Merge Channels, select RGB and the three images should already be in the pop-up (or else pop them in there)...There you are, pix `n pix in full color.
8. Needless to say its fun to try that with splitting into HSB instead and maybe just treating the Hue or Saturation channel with some patterning. (Too bad I can't upload more color examples)
Have fun!
Don't take it so seriously!
Play around!
Then when you got something good, take it immensely seriously!
Tell all the usual targets about your favorite tips. Tell me which one that is, too.
P.S. As some of you know, I was bitten by a rather obnoxious virus. The doctors say it was likely contaminated food around the time of my Europe trip (I may never eat there again...lol). I am climbing out of the hole, though, it ran its course and I am just a bit weak now. This KPT is proof that I am nearly back to normal. I had to pass on Japan, Siggraph and Macworld though.
This did throw my schedule off a little, but I am still clinging to the hope that I can get the CD pressed by the end of August. Since we will very likely also offer floppy based versions of the tips and filters, there may be some items to acquire before that time anyway.
Luckily even as I lay in bed with 103 fever for almost two weeks, there was enough to do for the programmers with the KPT filters that we advanced further. What we have so far `looks and feels' really, really neat. I will keep you posted up here first, as usual.
Some of you should still send the feedback file in. I have such fun finding out what all happens out there in the real world.... e-mail to 71333,3542 or via Internet from any other service just to "kai@aol". Works great. I have mail from Tokyo to Vienna now... greetings ..Kai
Matthias Müller-Prove :: User Innovation + Interaction Design. Modified: 1/31/14

