#10 Litter Removal: Moiré, a scanner's pesky little companion
Why?
(Dana Carvey Bush voice >) "Because is baaad, it's baaaaaaad...."
Seriously, no matter how good you are, these things are bound to happen with any color scanner. If it hasn't happened to you yet, watch out and read on, because otherwise Murphy will make sure that it will occur in a really important image at the worst time possible.
What?
The term "Moiré" refers to a phenomenon that occurs when two patterns overlap or blend and then create a third `Interference' effect. Most often this is not intentional and can only be described as an artifact or `error'.
fig 1a) 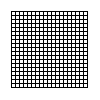 fig 1 b)
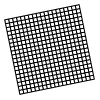
Two patterns at an angle to each other can create.......
fig 2a) 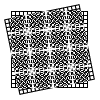 fig 2b)
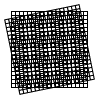
...the dreaded Moiré interference.
There are two basic categories: Subtractive, where all areas shared by both patterns `cancel' each other out (fig 2a) or Additive, where commonalities amplify each other (fig 2b).
Either way, the new Moiré interference is clearly visible in both versions.
Tip >>> You can of course use this in creative and constructive ways. In the above example 1b) is merely a rotated copy of 1a) and you can achieve 2a) by using Image > Calculate > Difference of 1a) & 1b) followed by Image > Map > Invert. To get 2b) use Image > Calculate > Multiply 1a) & 1 b).
There are several instances where this can happen to you with a scanner: either the image contains repeating patterned features, or is itself printed in a raster. Either way that can clash with the intrinsic raster which the scan process imposes by its nature: using a linear array of sensors traveling in lines across the image.
As a very basic suggestion: it should become obvious at this point that the orientation of the image on the scanner is one variable that can make a big difference and happens to be easily controllable. The scanner makes exact horizontal scans analogous to fig 1a) and if the image lies at an angle as in 1 b) then you are inviting the artifacts of fig 2) to rear their ugly little heads.
Unfortunately it isn't as easy as rotating the artwork to that `magic angle' and be done with it, since almost every angle will create a new set of moirés, one more interesting or annoying than the next. It can be a simple method to eliminate certain local irritants though and is a good first option.
Tip >>> If you find a setting that works for a subset, e.g. for the top but not the bottom, consider saving two or more angled scans and open them simultaneously in Photoshop to composite the best case. Since this involves rotation to align the parts, its not suggested for the novice or casual user.
Note that we are not talking about merely "getting it really straight on the scanner" as the simplistic samples seem to imply. This can still happen even with 100% straight art, since there is a beating effect with the print raster, which itself has multiple angles in it...
Tip >>> The major source of Moirés is the print raster and it is therefore vastly superior to use continuous tone photographs rather than a printed copy! Always try wherever possible to obtain such a contone version and resort to scanning prints only where no alternative exists. This goes double, (no, make that RGB triple!) for color prints.
In fact, the majority of the troubles stem from such color print scans and the majority of this doc file is concerned with getting rid of the color moirés that result.
Some other basics: It seems fairly self-evident that the artifacts are linked to the frequency of the raster. What that means in practical terms is: scan with the highest resolution you can afford! A very typical mistake is to back into the scanner settings to match a final size objective; e.g. you are trying to create a screen size picture, such as a startup screen, a slideshow title, or a logo. Scanning at 72 dpi 640x460 may work just fine sometimes, but in tricky situations you should oversample as much as you can. "Afford" means time, memory and disk space, not $$$ in this case. If you go up to 300dpi or even 600dpi you tend to get a rather large file very quickly, 20Megs or even 200 Megs are quite possible. You may have neither the space nor the time to do this a lot, but go as high as you can.
The point is that with the finer resolution the artifacts get smaller as well, and it is a lot easier to deal with them and then reduce to size in Photoshop. The other point is one of plain math: "if it ain't in there, you can't create it", meaning if information is lost you can't forge it out of thin air. With the high res scan you have much more information and algorithmically sizing it down will at least create the proper averaging of neighboring pixels. I could illustrate this with many examples, but it seems rather obvious.
There are several other tools you should have in your arsenal, but they tend to get overused in this context: Gaussian Blur and Unsharp Masking. Their legitimate place is to punch up the overall sharpness and reduce fine jitter and speckles, they are however no panacea for Moirés!
Tip >>> Use Gaussian Blur first and while you are still in the highest possible size/resolution. Consider that you can use fractional values, in fact I often find 1 to be too little but 2 to be already a bit much (in this context), so I would start with 1.5 or thereabouts. MetaTip >>> Select a small marqueed rectangle in a particular area of interest. It is first of all much faster to do this in a small area and you can readily judge the difference between before and after. Affecting the full screen image with a filter requires that you do the comparison against your memory of the before, which can be deceiving. In order to see subtle changes, use command `h' "Hide Edges" to get rid of the marching ants. Another way to do this is to use command `c', command `n', return key, command `v',(easy macro candidate) which will copy the selection, make a new window in the correct size, say ok to the dimensions and paste the chunk into it. The advantage is that you can drag the new window over the old for comparison and can do any number of operations without worrying over the fact that you can only undo one step at a time. I even add another `duplicate' to that in order to work on a copy of the area, in order to try again and again. This is not unlike `bracketing' in Photography where you try to under- and overshoot the right setting.
Tip >>> In something like Gaussian Blur use a deliberately conservative number, erring on the small side. Then use command "f" to repeat the last filter operation as often as necessary. Caveat : the UNDO command "z" will only revert the last of these applications of the filter! MetaTip >>> adding the option key, as in `option – command – "f"' will recall the last filter dialog quickly.
If you have done the slight blurring to average minute jitter and other unwanted details, you can use Unsharpen Mask to regain the overall sharpness. If you had done this on a larger size than final, consider that the convolution of the Image > Resize operation will have a sharpening effect as well, in other words, it is ok that the large image is just a touch blurry. In fact I recommend it before any downsizing.
Of all the Sharpen filters definitely use the Unsharp Mask. It is really a combination edge detect / enhance algorithm that will affect flat areas less than edge transitions and can create good contrast sharpness without the aliasing artifacts of the other Sharpen options. Again, set it conservatively small and repeat the application with command-'f'.
Other filters such as Despeckle and Median, Custom Kernels, and others can be applied as well. Trouble is that they don't have any control over the amount and can be rather devastating to small details. Watch out for such loss of minutiae! While you are successfully eliminating spots in the foreground a small person in the distance may lose both eyes in the process...(see, your mom was right: "be careful you can poke someone's eye out with that!")
Another simple method for local cleanups is the rubber stamp cloning brush. It can work wonders to eliminate specks of dust, scratches, etc... In case you haven't figured it out, option-click with it on the source and then click to copy that to a destination. Tips >>> Keep the caps lock key down for the cross hair cursor. Double click on the tool and in the dialog set it to smaller size, maybe even at less opacity. Use the option key click method to `travel' along straight lines. Get familiar with the options: `darken' `lighten' and `color only' can make fix ups easier once you know what they do.
All in all, a very basic concept should enter into the discussion here: it is rare that any one of these things would work perfectly applied to the image as a whole! Kind of like using a carpet spot remover on the entire carpet all the time... It is highly recommended that you identify and isolate particular problem areas and deal with each in its own way! This might simply mean different amounts of the same technique or wholly different methods. Use the lasso to select such areas. Tip >>> with the option key down the lasso works in rubberband mode, much easier to control and generating fewer vertices (corner points). MetaTip >>> You can then also use Selection > Make Path to convert the lassoed area to editable bezier control points, edit them and convert back to a selection. Coolness!
All the above basics are worth knowing, the trick of course is getting the experience when to apply which one... Still, the dreaded archnemesis Moiréarty will hardly wince at these attempts. It has nothing to do with sharpness, blurriness, resample sizes, and will resist manual cloning methods with ease. Quite elusive that little bugger...
What follows is a particular method to attack the kinds of moirés most prevalent with flatbed scans of printed source material: color artifacts, raster beats, interference patterns.... A real life case:
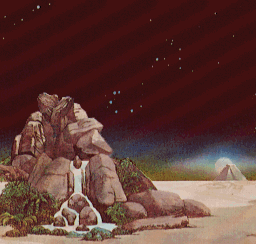
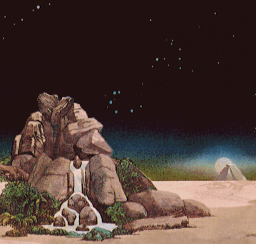
fig 3a) a small section of a scanned image with serious Moirés before and fig 3b) clean after the process...
Note >>> On an 8 bit card this may look a little dithered to you. The system palette is not very well suited for the colors in this image.
The real example used here was scanned from a small postcard at 600 dpi. Shown is about 20% of the whole picture with a particularly prominent Moiré problem. I have at times tried the Microtek, Umax, Epson and Howtek, all of which would exhibit such behavior to some degree.
At this point it behooves me to tell you that reading the KPT #8 on Arbitrary Maps would help in understanding the method, as it involves the same dialog and I may not re-explain the basics of it here. So if the following is obtuse, give that a shot.
As a test, I isolated the small center portion of 3a) and copied it into a new window. Then I invoked the Image > Map > Arbitrary... dialog. As soon as the cursor leaves the dialog window, it turns into the "eye dropper" (As opposed to selecting from the toolpalette!). The idea is that it where the eyedropper is positioned in the image, the corresponding point on the Arbitrary Map will be circled.
Note >>> The key to eliminating the color bands is NOT doing it for all three channels RGB at the same time. In our case we want to focus on the red channel (Check the `red' box in the ArbMap dialog), but you may want/need to do it in more than one channel. But do it one by one in each, not in the master, since the settings will be different for each.
As one moves the eyedropper across the moiré bands, the encircled spot on the ArbMap will flicker back and forth in a certain range. THAT IS THE ESSENTIAL STEP!
fig 4) 
moving across the bands....
fig 5) 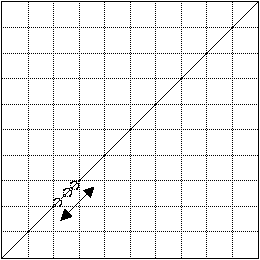
...flickers points in a narrow range of the ArbMap. (Red channel selected)
If you can find these transitions in your moiré problem and they can be confined color by color to a certain range, you are almost home free... All that needs to be done now is to exploit an intrinsic feature of the ArbMap. (Again, for a discussion of the basic theory read KPT #8 first)
Each particular Y value represents an assigned output level, i.e. intensity. If you want to assign the SAME value to several different input levels, in other words if you want to force the Moiré bands to be the same color as the background, all you need to do is draw a horizontal line for each of the shades! And in true photoshop style the re-mapping will happen in realtime in front of your eyes! Amazing....
fig 6) 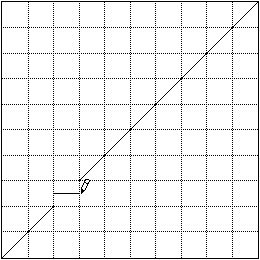
Assigning the same Y value = intensity to bands eliminating Moirés
Note that this works very, very well and is a procedure of surgical precision. It affects only a very narrow range of the total colors (in this case 90% of the red channel is unaffected, and green and blue are completely unscathed....) so that for instance it will clean up the moiré sky instantly while leaving the white stars entirely unaffected! Lesser inspired methods would have you mess around with the red channel in Levels... or other Image > Adjust tools, which would have upset the balance easily (cyan or pink stars for instance). You need to try this with a real life case (the above sample is provided in this archive) to appreciate both the power, speed and subtlety of the process.
It may seem simple, even downright obvious in hindsight. Let that not deter you from trying it. The same was said for "the wheel", you know...
Note >>> if your problem was `magenta' stripes you may need to do it in both the red and blue ArbMap channel, (similarly cyan = green &blue yellow = red&green.)
Tip >>> as always, keep the option key depressed and just click the start and end point instead of drawing every pixel in between. Oddly, the shift key vertical constrain does not work here.
Although usually a very narrow fraction of the colors are involved, it may still be safer to isolate areas via selections and process them one at a time. In this particular case a loose lasso of the sky area worked very well indeed.
As a neat side benefit, you get to control not only that the bands are all assigned to the SAME shade, but also WHICH shade that is. So in realtime you can try out several colors. More to the point you can use the eyedropper to find any other spot in the image that you would like to match, note the Y value for that spot in the ArbMap and simply assign it to the Moiré range. Voilâ....
fig 7) 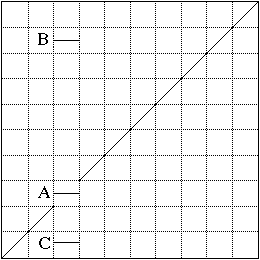
varying levels determine the color....
Also if there are certain points that just don't want to cooperate, use the eyedropper to query where on the ArbMap they live (again, one channel at a time) and wipe `em out...
Note that you can use "Smooth" to soften the harsh transitions you are creating, or "Reset" to start over and try again. The curve gets remembered for each of the 4 options Master, R,G and B separately!
If there are gradient color ranges involved, you may also apply the cousin of the ArbMap, Image > Adjust > Curves. It would be hard to impossible in the Curves dialog to eliminate specific ranges, but it excels in compensating in nonlinear forms, e.g. curves, which is correspondingly tricky to do in the ArbMap.
This does not exhaust the topic of scanning, but it ought to get you a little further anyway...
With particularly stubborn problems, send me a small sample maybe I can cook up something.
Happy Photoshopping, Kai Krause
By Matthias Müller-Prove. Modified:
5/1/20

